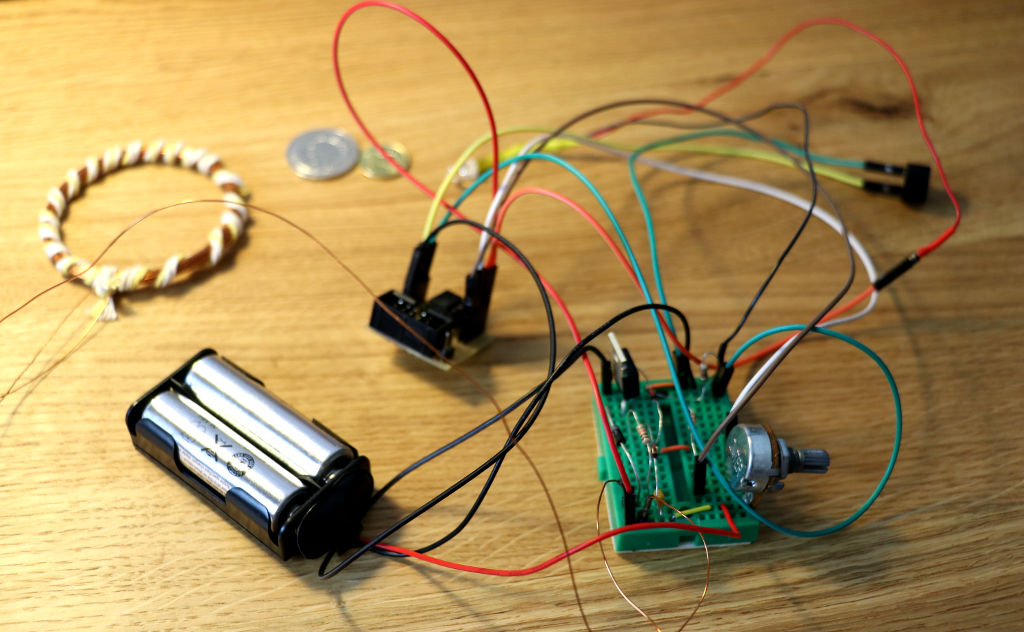
This experimental project shows how to build a simple PI (Pulse Induction) metal detector based on ATtiny13 / AVR microcontroller. My goals were to make a circuit as simple as possible and to use only popular / cheap electronic parts. The device has been tested with very small coil (55mm diameter, about 30 turns of 0.5 DNE) and only 3V power supply. It’s my first design of PI metal detector and I’m really happy with the results! The prototype was able to detect little coins (6cm distance) and wires in the wall. The code is on Github, here.
How It Works?
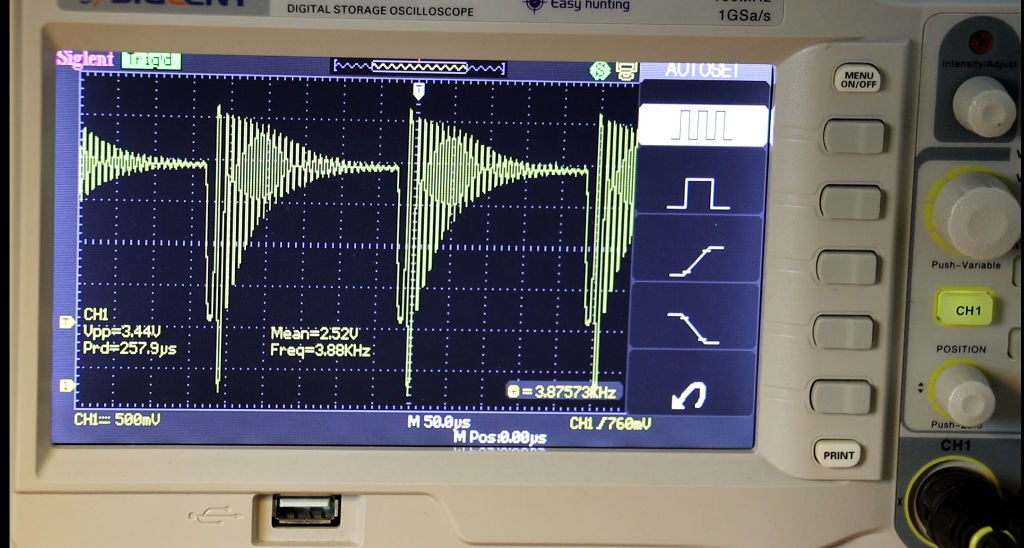
Presented metal detector uses PI method to generate a voltage spike in a search coil connected in parallel with capacitor. Next, ATtiny13 uses an Analog Comparator to measure a decay time to zero of resonant circuit. When a metal object nears the loop it will decrease time it takes for the pulse to decay to zero. The change in the width of resonance time is measured to signal the presence of a metal target.
Note that the typical PI detector designs avoid resonant circuit and the measured factor is slightly different!
User Instructions
- Turn on the device. The calibration process takes about second and ends with buzzer signal.
- Use variable resistor to adjust detector sensitivity (you can find it somewhere between a continuous buzzer signal and complete silent).
- The device is ready to work!
Parts Required
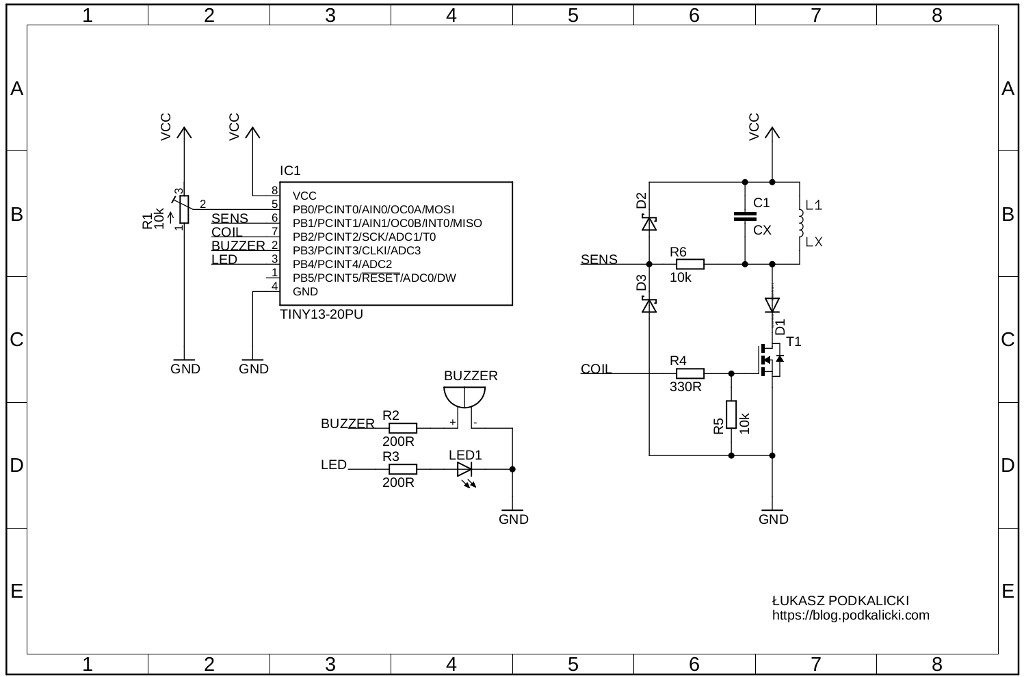
- ATtiny13 – i.e. MBAVR-1 development board
- T1 – IRF3205 (MOSFET; N-Channel)
- LED1 – basic LED
- D1 – i.e. 1N4007
- D2, D3 – 1N4148
- R1 – variable resistor 10kΩ
- R2, R3 – 220Ω (5%), see LED Resistor Calculator
- R4 – 330Ω (5%)
- R5, R6 – 10kΩ (5%)
- C1 – 470nF
- L1 – ∅ 50-55mm, about 30 turns of 0.5 DNE
Circuit Diagram
Software
This code is written in C and can be compiled using the avr-gcc. All information about how to compile this project is here.
/**
 * Copyright (c) 2019, Łukasz Marcin Podkalicki <lpodkalicki@gmail.com>
 * ATtiny13/037
 * Example of simple PI (Pulse Induction) metal detector.
 */

#include <avr/io.h>
#include <util/delay.h>
#include <avr/interrupt.h>

#define	COIL_PIN                  PB2
#define	BUZZER_PIN                PB3
#define	LED_PIN                   PB4

#define	PULSE_WIDTH               (32) // microseconds
#define	CALIBRATION_ATTEMPTS_MAX  (128)
#define	MEASUREMENT_ATTEMPTS_MAX  (2048)

#define	SIGNAL_ON()               (PORTB |= _BV(LED_PIN)|_BV(BUZZER_PIN))
#define	SIGNAL_OFF()              (PORTB &= ~(_BV(LED_PIN)|_BV(BUZZER_PIN)))


static uint16_t
measure_decay(void)
{
    uint16_t i, counter = 0, decay = 0;

    PORTB |= _BV(COIL_PIN); // pulse on
    _delay_us(PULSE_WIDTH); // pulse delay
    PORTB &= ~_BV(COIL_PIN); // pulse off

    for (i = 0; i < MEASUREMENT_ATTEMPTS_MAX; ++i) {
        if (ACSR & _BV(ACO)) {
            decay = counter;
        }
        counter++;
    }

    return decay;
}

static uint16_t
calibration(void)
{
    uint8_t i;
    uint16_t tmp, decay = 0;

    /* calibration process */
    for (i = 0; i < CALIBRATION_ATTEMPTS_MAX; ++i) {
        tmp = measure_decay();
        if (tmp > decay) {
            decay = tmp;
        }
    }

    /* signalize end of calibration */
    for (i = 0; i < 3; ++i) {
        for (tmp = 0; tmp < 64; ++tmp) {
            SIGNAL_ON();
            _delay_ms(0.3);
            SIGNAL_OFF();
            _delay_ms(0.3);
        }
        _delay_ms(64);
    }

    return decay;
}

int
main(void)
{
    uint16_t decay_cur, decay_max;

    /* setup */
    DDRB = _BV(COIL_PIN)|_BV(LED_PIN)|_BV(BUZZER_PIN); // set COIL, LED and BUZZER pins as output
    ACSR = 0; // clear register

    decay_max = calibration() - 1;
    _delay_ms(500);

    /* loop */
    while (1) {
        decay_cur = measure_decay();
        if (decay_cur < decay_max) {
            SIGNAL_ON();
            _delay_us(100);
        }
        SIGNAL_OFF();
    }
}


Hello Lukasz, thanks for the project! There is one thing I don’t understand to in the circuit – what are the D2 and D3 diodes good for? I’d assume they could be handy as a voltage regulator for the SENS output signal. But I don’t see how that type in that configuration could help with that. Also when I put the circuit together, they don’t seem to clamp the signal.
fajny, ale znając życie zapewne nie znajdzie złotej obrączki i na złoto ślepy jak kret – jako puls induction. 100hz 😉
Stanowczo. Ten projekt jest taką propozycją do zabawy i eksperymentów z wykrywaniem metali 🙂
Ahoj prosím ťa mohol by si mi poslať hex súbor.
Ďakujem
S pozdravom
Laco
Witam
Spodobał mi się ten detektor metali.
Robię taki dla siebie i syna.
Mam wszystkie części.
Problem to zaprogramowany układ.
Można taki z softem gdzieś kupić.
Proszę o info.
Pozdrawiam
Zrobiłem to urządzenie, ale z jakiegoś powodu działa bardzo cicho. I bez względu na obecność tranzystora 🙁 Metal wykrywa (szczypce – 5 cm.). Powiedz mi, gdzie mam szukać problemu? 🙂
Zgaduje, że kiepski buzzer użyłeś (albo z generatorem, w tym projekcie powinien być bez generatora). Ten piezzo co ja używałem, po wielu próbach, mimo iż minęło wiele miesiący od tego czasu, nadal mi dzwoni w uszach 😉
WinAVR is a severe pain in the ass!
Why can’t you just post a compiled .hex file here? I would be happy to have it! Thanks!
Hi Łukasz
Very nice! I was wondering : wouldn’t it be more sensitive measuring the shift in frequency instead of shift in decay time (i.e. resonance position instead of resonance width) ?
Hi lukasz … can u upload the hex code here ?
I made the metal detector but it dosnt sens any metal object
This looks like a funny and interesting experiment. Why did u choose to program in C language?
I tried to compile this code in the AVR sketch but it gives me an error code.
uint16_t measure_decay() ‘ was declared ‘extern’ and later ‘static’ [-fpermissive]
Where did I go wrong?
Hi, I dont know what require AVR sketch to build this project but you can be sure that avr-gcc compiles it well.
You say to use coil wire 0.5DNE
What does DNE mean?
I only know AWG or SWG wire.
Thanks
Chris, its simply Cu wire like that one used it DC/AC motors with 0.5mm diameter.
Have you tried any of those experiments with higher supply voltage/larger coil? I’m interested in using this to detect nails and similar in wood that I’m salvaging, to spare the cutting blades from damage.
I have tested it with 5V supply and longer pulse (~100us). The device consumes more current but gives better results with the same coil. I think, it should detect the nails in wooden plank.
How small a metal item can this detect at 5cm? I often lose a small screw on the floor and this could help.
The coil I presented here doesn’t detect a smaller screws then M4. There is a space for experiments with bigger coil and higher power supply (5V) to get better range/params.